Q: JLCPCB edge plating guideline says this - "supply an annotated diagram showing which edges to plate".
I have this edge plating annotation diagram ready. However, there is no place to actually include this diagram during the PCB order process in the JLCPCB website. So my question is, where to attach this edge plating annotation diagram?
On a side note, I also included detailed fabrication notes (board dimensions, stackup, controlled impedance, drill summary, etc.) with my PCB and exported this with the Gerbers for JLCPCB, in case they have any questions. However, they mentioned that they would discard all these fabrication notes in an email. How do y'all send fabrication notes to JLCPCB? Is it not required?
A:
1:Edge plating diagram
For edge plating, you can directly design the plating area in the Gerber file (normally on a separate layer). When placing the order, please also add a remark such as “Edge plating as per the dedicated layer in the Gerber”. In addition, we strongly recommend selecting the option “Confirm Production File” during checkout, so our engineers can confirm with you before fabrication.
2: Fabrication notes (dimensions, stackup, impedance, drilling, etc.)
Our engineers mainly follow the Gerber data for production. Other supplementary files in your compressed package (such as English notes, DXF, Excel, etc.) will not be referenced to avoid any conflict with the Gerber. Therefore, please ensure all required parameters are correctly defined in your Gerber files, as these will be used as the sole basis for manufacturing.
① Board dimensions: Just make sure the outline in the Gerber is correct. The website will also automatically recognize the size. If you find the detected size to be inaccurate, you can include the correct dimension in the remarks.
② Stackup: You can select the required stackup when placing the order. For impedance-related designs, you may refer to our impedance calculator to choose the most suitable stackup: https://jlcpcb.com/pcb-impedance-calculator.
③ Controlled impedance: By default, impedance tolerance is ±20%. If you require tighter control (±10%), please contact our online customer service or email our support team (support@jlcpcb.com) to enable the whitelist option. Once enabled, you can select ±10% tolerance. Please also include the impedance details (trace width/spacing, layer location, etc.) directly in the Gerber package and mention in the remarks where this information can be found.
④Drilling: Please design drills in the drill layer. Supplying a drill drawing file in the Gerber package is also recommended.
Overall, as long as your Gerber files are designed clearly, no extra documentation is needed. But for special requirements, remarks + confirm production file are the most effective way to ensure your instructions are followed. #JLCPCB#
The OSHWLab Stars 2026 Open Source PCB Design Contest is officially LIVE! This is your chance to turn your schematic into a global sensation.
- 💰 Massive Prize Pool: $85,000 total cash prizes up for grabs.
- 🛠️ Zero Cost to Create: We provide full Materials + Shipping support.
- ⭐ Legendary Jury: Get your work reviewed by the legends: Dave Jones (EEVblog), GreatScott!, Robert Feranec, Philip Salmony, Max Imagination, and Will Cogley.
- ✈️ The Ultimate Reward: Top 28 creators win International Round-trip Flights to meet the jury and the community at the Stars Conference 2027!
Stop dreaming, start routing. ⚡️#PCB#
👉 Enter Now:https://oshwlab.com/activities/stars2026

#JLCPCB#
🚀 Turn Your Logo Into a Physical Experience
Flat logos are everywhere.
Dimensional branding is what gets remembered.
With JLC3DP, you can transform a digital logo into a multi-material, high-impact 3D sign — without molds or production complexity.
Choose how your brand feels:
• Smooth and refined → Resin
• Solid and premium → Metal
• Tough and functional → Nylon
• Lightweight and scalable → Plastics
📍 Ideal for studios, offices, exhibitions, and branded spaces.
🖨️ Start here:
https://jlc3dp.com/3d-printing-quote
💬 What would you choose for your brand?
#Branding #3DPrinting #DesignEngineering #AdditiveManufacturing #JLC3DP
🖨️ Start here:
https://jlc3dp.com/3d-printing-quote
The answer often comes down to whether you’re working with a thermoset or a thermoplastic.
This article explains the key differences, compares their properties, and looks at how each performs in manufacturing and CNC machining 🛠️
Check it out: https://jlccnc.com/blog/thermoset-vs-thermoplastic
In CNC machining, most design discussions focus on dimensions, tolerances, hole positions, thread depth, and surface finish. Those are obviously important, but many assembly and handling problems begin somewhere much smaller. The edge condition of a part, especially around holes and contact features, often decides whether a machined component feels clean and well-made or awkward and troublesome in real use.
This is one reason small edge features deserve more attention during design review. A part can be dimensionally correct and still create unnecessary problems if the entrance to a hole is too sharp, if burrs remain around a cut feature, or if repeated assembly quickly damages an untreated edge. These issues are easy to dismiss during CAD work because they do not look dramatic on the model. In production and assembly, they show up immediately.
A sharp hole entrance is a good example. On paper, the hole diameter may be perfect. In practice, a screw may start poorly, a pin may catch at the edge, or an operator may need to force the part into position. Once that happens, the edge is more likely to chip, deform, or raise a burr. The result is not just an ugly entrance. It becomes an assembly problem, and people often blame the fit or the tolerance before they look at the edge itself.
This is especially common on threaded holes, locating holes, and repeated-use features. A threaded hole may technically be correct, but if the entrance condition is rough or too sharp, fastener starting becomes less consistent. A locating pin may fit once but damage the hole mouth after repeated installation. On parts that are assembled and disassembled many times, the edge condition becomes part of the product’s real durability.

That is why controlled edge preparation matters. In many CNC parts, a very small edge treatment can reduce a much larger downstream problem. It may help guide entry, protect the feature during handling, reduce burr-related interference, and make the part feel more deliberate in assembly. This is not just about appearance. It is about how the part behaves.
The same principle applies to outer edges. A part does not need razor-sharp corners to be considered precise. In fact, sharp untreated corners are often less practical. They chip more easily, feel rougher in handling, and may create avoidable safety concerns during assembly or inspection. A controlled break at the edge often improves the part without affecting the design intent in any negative way.
Of course, not every edge needs the same treatment. Some edges only need a light break to remove sharpness. Others are functionally important and need a more deliberate feature to support alignment or entry. This is where machining knowledge becomes valuable. If every edge is treated casually, important features may remain under-controlled. If every edge is over-specified, cost and machining time go up without adding much value.
For designers and buyers, the practical question is not whether every part needs aggressive edge treatment. The real question is which edges affect function and which ones simply need to stop being sharp. Hole entrances, thread starts, locating features, and repeated assembly areas usually deserve more attention than random exterior corners.
This is also where communication on the drawing matters. General notes such as “break sharp edges” can be useful, but they are not always enough when the edge geometry affects assembly. A controlled entry feature should be treated differently from a casual deburred corner. If the edge is doing real work, the print should make that clear.
A good example of this thinking can be seen in the way chamfers are used on machined parts. A chamfer may look like a very small detail, but it often improves entry, protects edges, and reduces assembly frustration in ways that are easy to underestimate. A more detailed explanation of that topic can be found in this guide on chamfer in CNC machining: purpose, angles, applications, and drawing guide.
The broader lesson is simple. Small edge features are often treated like secondary details, but many of them influence how a part is actually used. In CNC machining, the difference between a part that merely passes inspection and a part that assembles cleanly, handles well, and lasts longer is sometimes found in those details.
When edge condition is reviewed early, many downstream problems become easier to prevent. Burrs are easier to control. Hole entry becomes smoother. Threads start more cleanly. Handling damage is reduced. Repeated assembly becomes more consistent. None of that changes the headline dimensions of the part, but it changes the real quality of the result.
For that reason, edge treatment should not be treated as an afterthought. It should be considered as part of how the design functions in production and in use. Small features often carry more value than they appear to on the drawing.


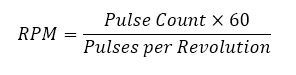
, is the simplest signal in discrete signal analysis. It is defined precisely in my text as: